Expanding your retail presence and taking it to the digital space is one thing, but maintaining the same credibility and brand image in the eyes of your customers can feel overwhelming. To counter this, you should always follow a “step-by-step approach” where each decision you make works as the stepping stone. On that note, the first step towards your online selling journey is to build a captivating eCommerce store backed by a robust commerce engine (eCommerce development platform). There are multiple options available, such as Shopify, BigCommerce, WooCommerce, and Adobe Commerce. However, studies conclude that Shopify is one of the most popular and leveraged platforms, with 30k live websites and 4.61 million active users as of now.
This implies that the maximum number of eCommerce brands trust Shopify. The reason? It offers incredible customization capabilities, flexibility to integrate commerce tools or any other technologies as per your requirements, and a built-in scalable architecture so that your store can seamlessly scale with your growing business. Additionally, it puts you in control to create, optimize, and run your store on your terms.
However, as we know, there are two sides to a coin; the other side, in this case, would be the development of your online store. Now, the development part works similarly to the “brick and cement” of a building. If it’s not correctly placed or if the cement is of poor quality, the building will soon fall off. Hence, to ensure the success of your online store, you must abide by the right approach– hire a professional shopify development company and follow a step-by-step shopify development process.
By working with Shopify experts, you get customized, outcome-driven solutions that are built to cater to the unique needs of your business and yield measurable results. As far as development steps are concerned, they allow you to identify your custom needs and create a structured shopify workflow– from concept to launch.
How to Create Your Shopify Store — A Step-by-Step Shopify Development Process
Building a custom Shopify store can feel daunting, considering the complexities of the platform. What will the process look like, and what will be the set of phases you will go through to reach the final stage, the launch of your store? These might be the questions you would be pondering on right now. Therefore, we have listed the easy steps in the section below to help you understand the phase-by-phase shopify development process.
-
Product Discovery and Strategy
Every development project begins with product ideation. This is the phase where you need to bring a realistic idea to the table, validate it against the market trends, and identify who your target audience will be. In other words, you should know the answers to–what you are building, for whom, and why. This is important because you probably don’t want to build a store no one likes to visit, right?
Start by conducting market research to identify the ongoing trends, customer demands, and problematic areas to conclude how your solution will address them. To conduct a productive research, use these tips:
- Google Keyword Planner that can help you find the number of people who search for a specific solution you are looking to build.
- Identify your competitors and look for the customers they have. You can audit their website and try to understand their USP, why customers opt for their products, and how you can bring something unique to stand out.
- Utilize AI and ML tools for predictive analytics and demand forecasting, which will help you understand which solution is most estimated to go viral.
Based on your research, discover your niche (whether you want to sell comfy footwear for adults or you want to sell paraben-free makeup). Remember that your niche will be directly proportionate to the current customer demands.
Next, identify your target audience based on market research and your specific niche. These will be the users who are most likely to show interest in your store. Conduct thorough research based on demographics, location, behavior patterns, and particular goals to create buyer personas–a character description of your typical users.
Once you identify your target audience, define a success benchmark. In other words, you need to set a business objective in the form of key performance indicators (KPIs) that you wish to achieve with your solution. This will help you determine the outcomes of your development efforts. Additionally, you must have a feasible product strategy in place that will keep you aligned with your business goals, in sync with customer demands, and help you measure success in the long run.
-
Planning the Development Process
Once your niche discovery, target audience identification, and product strategy are in place, you need to plan the development process for your Shopify store. You might feel excited to include every possible feature within the store. But here is a reality check. The more the feature count is, the more complicated your storefront will look, and it will only lead to dissatisfied customers.
Instead, keep your focus on adding the needed features, and even if you feel there are some features you “want” to add but don’t wish to overwhelm the UI/UX, they can be handled via Shopify APIs.
Now, define the scope of your project, which will include the features and specific use cases you wish to cover within your store. It will also include the goals (identified in the first step). These details will serve as the foundation and help your hired Shopify development company to build a minimum viable product (MVP) for your store. MVP will be a basic version of the store comprising only the core features that would be enough for early adopters to use. Based on their feedback, further iterations will be made even before you make the final launch for the general public.
After creating the project’s scope, create a roadmap for your Shopify store. This will include the details of the theme, logo, brand elements, etc, and also add an expected timeline to determine which design template is required at what point of time. To do so, you can implement project management methodologies to group all your design and even development requirements into small deliverable milestones.
The specialized Shopify experts like Successive Digital have dedicated product engineering solutions and utilize an agile methodology for project management where each task of design & development is split into small milestones or phases. Under this methodology, our team follows a series of iterative cycles consisting of continuous planning, execution, and evaluation.
-
Setting Up the Shopify Store
Now it’s time to bring your ideation, plans, and roadmap together to start building your store. To begin with, create your business account where you need to add your business details, store’s name, and other basic information where you make the Shopify platform acquainted with your goals and selling requirements (this way, it will personalize the options to make your online store more aligned). After adding all the information, your store is finally created. Hurray! Now begin with store configuration via the admin panel. This includes setting up the domain name, making changes to the settings, adding the admin user, and utilizing Shopify’s built-in tools.
Feeling overwhelmed by the complexities of Shopify store development? Let our experts handle it for you.
The team can configure the store settings and handle its designing as well as deployment so that you can launch your store 2x faster and focus on what is core to you (product promotion and marketing strategies).
-
Design and Development of the Store
Once the configuration of the store is done, the design phase will follow. Remember that the success of your store depends on how customers feel about it. And the very first thing that can “impress or depress” them is the design of your store. After all, it is what they are continuously interacting with.
Take design as the presentation of the food you ordered while sitting in a restaurant. The look and feel of the food served comes first, and then comes the taste. We immediately make a negative impression when it is not properly arranged or served, right? Similarly, when things on your storefront are misaligned and confusing for the user to navigate, then they become dissatisfied and immediately leave. According to a study, 94% of first impressions of online shoppers are based on design. Based on that, they usually make an initial judgment about the brand.
Hence, work significantly on your store’s UI/UX. Here, the Shopify design experts can help build a customized storefront using a framework like React, Angular, or VueJS. This way, your customers can shop seamlessly from their preferred shopping channel. Now, they will add other design elements like colors and typography and optimize the logo to fit flawlessly.
Tip: In this social-media-focused era, an aesthetic logo and theme usually tends to stay in the user’s subconscious even if they forget the name of your brand. So, give them something “demure and mindful” to remember you.
To proceed further after store design, the Shopify professionals will work on the development part. This is where the technical architecture– the backend and the frontend of the store are created. The backend involves server-side setup to support the functioning of the store, like setting up Shopify APIs, integrating the database for timely data retrieval, adding Shopify built-in apps, and integrating relevant third-party software for the required functionality. Frontend, on the other hand, is building the user-side experience. This involves building a storefront (as explained above), and optimizing performance to eliminate lazy loading issues.
-
Mobile Responsiveness
When we talk about the store’s design, mobile responsiveness immediately comes up. Considering the fact that most online shoppers today utilize mobile devices, it is important to make your Shopify store mobile-friendly. Your hired shopify development company will customize the design of the store and make it responsive. This way, the store will automatically adjust its layout, design, and functionality across all devices, whether desktop, mobile, or tablet and create a seamless, consistent experience at every touchpoint.
Moreover, they will modify the theme of the store from the available Shopify themes or facilitate custom Shopify theme development to align with your brand identity and also ensure the theme is mobile responsive. The team will then employ a few techniques like fluid grids, flexible images, and CSS media queries to ensure the dynamic adjusting of the store’s design based on the screen size, leading to high-end responsiveness.
-
Adding Products and Information Pages
Now that the base (the design, backend, and frontend) of your store is in place, the next step is to add your products and their details. This will include product descriptions, photos, and media, as well as product information (specifications/features, pricing, color, and size options). Make sure the product images you upload are of high quality in order to attract and engage your customers. After adding the products, they must be placed correctly in the catalog.
For example, if you are selling clothes and shoes, then the products will be categorized in the “hierarchy format” as shown in the image below:
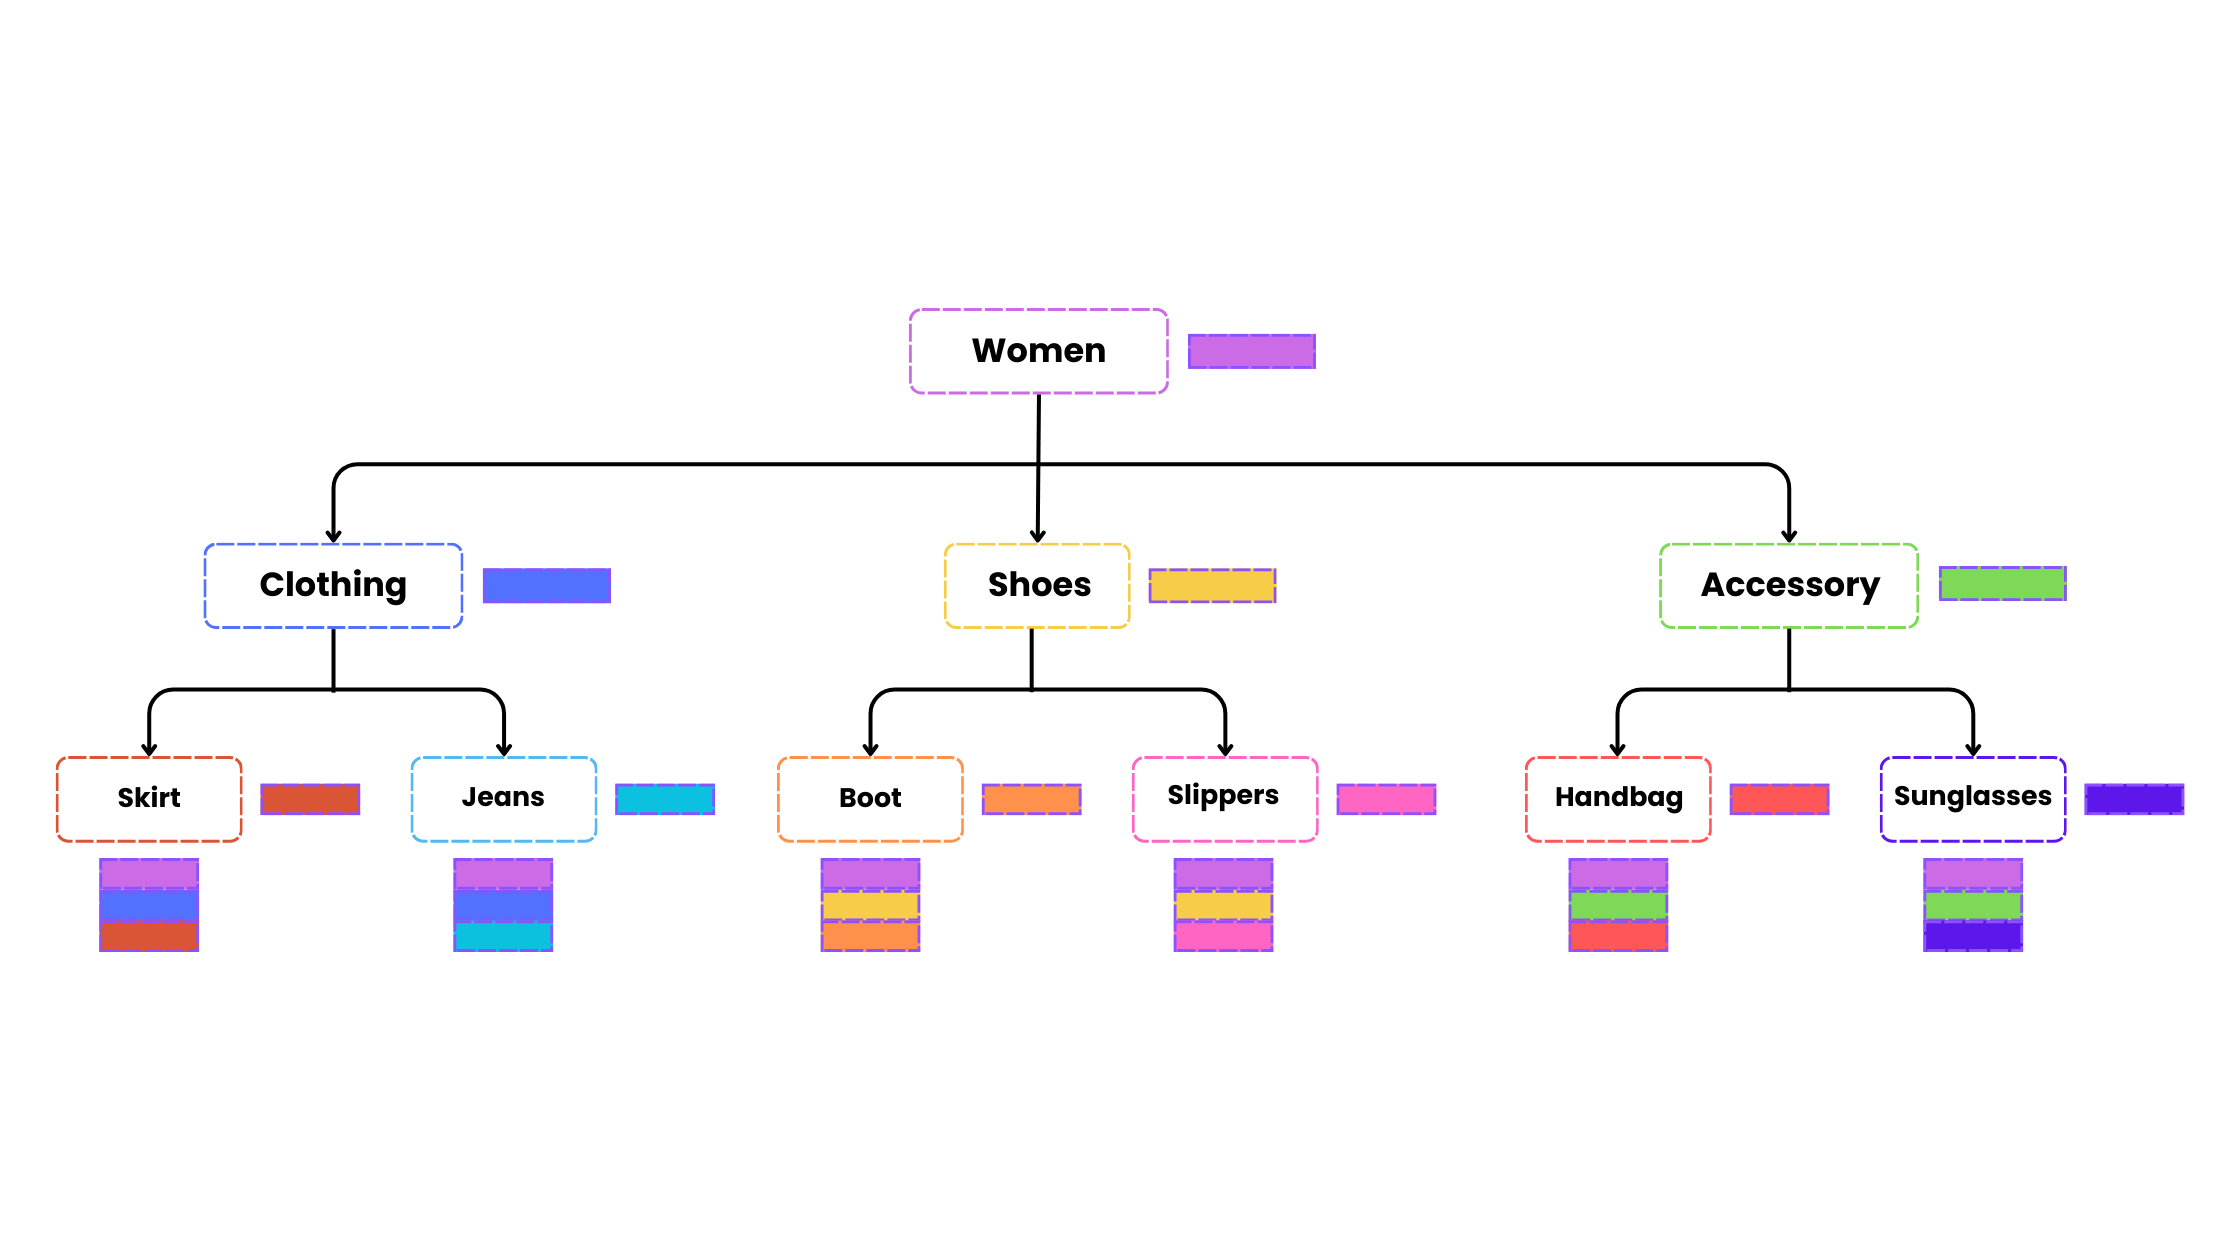
After product categorization, add inventory information and the product code (to easily track the stock levels and quickly update the “out-of-stock” label whenever applicable). Thereafter, product tags will be added to organize products and tailor collections for specific customers. This will improve customer experience and boost sales.
Once the products are added, create information pages that will guide the customers, be a welcome for the new ones, as well as to answer usual questions, if any. These pages include:
- Homepage
- Contact Us page
- FAQ page
- Policy pages
-
Set up Checkout and Shipping
After setting up the store and adding products, the next important step is to set up payment processing (checkout and shipping) to not just streamline product browsing but also make your customers feel safe while making the final purchase.
Start by choosing the right payment service providers (PSP) like Paypal and ApplePay, or utilize Shopify’s built-in payment processor, Shop Pay, for your store. PSP selection will depend on the transaction fee these platforms charge and the multi-currency support to show product prices in the customer’s local currency automatically.
Next, make sure to provide multiple payment options like credit/debit cards, UPI, buy-now-pay-later, and cash-on-delivery (for applicable products) to enable customers to choose their preferred mode of shopping and also give the option to save these details for next-time purchases.
Additionally, do not forget to customize the checkout page. While Shopify provides a built-in checkout template that can be further modified based on your brand’s theme, we recommend that you build a custom, simplified checkout with the minimum steps possible to improve the purchase experience of your customers. For example, Kylie Cosmetics optimized its checkout experience by integrating the Shop Pay option and side cart feature so that customers can view their cart items, check the bestsellers, and proceed to checkout quickly. This has allowed the brand to witness a 25% reduction in its cart abandonment rate.
If you’re still in doubt, this blog will help you understand the significance of a custom checkout solution for modern eCommerce.
Now, configure the tax settings to dynamically show the applied taxes for customers based on their shopping region and the country’s regulatory rules. Lastly, set up the shipping and fulfilment options. You will find this setting on the checkout page itself. Create a shipping strategy based on multiple attributes like the customer’s specific location, sales events, festive offers, and so on. You can add a free shipping tag for new customers and steadily add the shipping cost afterward when the scenarios change.
Tip: Give other checkout options like guest checkout and via social media platforms to make your products easily accessible and purchasable on the go for increased sales without pushing them to visit your store every time and sign up. This might cause product abandonment and loss of sales.
-
Test and QA of the Store
Now that your store is developed and the required settings are completed, it’s is time to push it for testing and QA. This phase of the shopify workflow is important to ensure that your store is fully functional, free of errors, and ready to be launched amongst the general public.
The shopify development company you hire will assign the QA and DevOps team for this phase. The QA team will conduct functional testing (testing of features and functionality), identify errors, if any, and fix them promptly. Meanwhile, the DevOps team will implement continuous integration and a continuous delivery (CI+CD) pipeline. In this pipeline, CI is an automated testing solution that is added to automatically trigger code testing every time changes are made to it. CD is the process where the tested and validated code is released and automatically uploaded to the code repository.
Another test involves non-functional testing (test of performance and interaction) to test the usability and whether a particular product offers interactive design or fails to do so. Also, read our ultimate guide to shopify development services.
-
Launch the Store
Once the store passes all the required tests, it is ready for launch. The Shopify professionals will push the store from the testing environment to the live environment. While the first few days can be a low grid for the store, it is important to pace things up with promotions, campaigns, as well as a positive attitude.
Your Shopify Store is Launched, Now Comes the Post-launch Strategies
-
Continuous Monitoring
Once the store is launched, the immediate action you need to take is to start monitoring its performance. This will help you match it with the success metrics you prepared in the first step, find where it is lacking, and make iterations accordingly. Moreover, gather feedback from the first few new users and also rigorously monitor the performance and visitor metrics to understand what is working and what is not. You can utilize Shopify’s built-in analytics tools or third-party ones like Google Analytics. This will help you gather relevant metrics and suggestions for improvements.
Remember that launching your store is just like putting your foot on the accelerator. To get the car moving in the right direction (in this case, your online store), you must keep your hands on the steering wheel and shift gears regularly (which means continuously monitoring and making improvements).
-
Optimize the Store for Search Engines
Apart from store monitoring, optimizing your store for search engines is very important once the store is live. You would be shocked, but many shoppers till-date utilize Google to search online stores, especially when it’s new for them. They also end up scrolling Google to reach product reviews and compare items. So, it’s clear that SEO is essential for your store, even if someone says it is old-school and not required.
Conduct keyword research to identify the queries your target users are utilizing. Once you have the list, start adding these queries smartly to your product content (descriptions, meta titles, meta descriptions, URLs, information pages, and blogs) to ensure it is well-optimized for search engines. Also, improve page load times by compressing images and minimizing code. You must also utilize the built-in SEO capabilities of Shopify to optimize your store quickly.
Lastly, to improve the credibility and domain authority, create relevant backlinks by writing third-party blogs that include natural links (not paid) to your store, improve store engagement, and encourage customers to write reviews that will positively impact the search engine result page (SERP) ranking of your Shopify store.
Plan Your Shopify Store Development with Successive Digital
As discussed above, creating an online store can seem daunting; hence, it demands businesses to make a pre-defined shopify workflow and follow it to ensure success. However, apart from creating the workflow, assistance from a professional team is also required to handle the custom requirements of your project. And when we say professional team, we mean to partner with Successive Digital–a dedicated Shopify development company that not only specializes in building bespoke eCommerce solutions but also holds a certified Shopify Plus partnership.
Across each project undertaken, our Shopify experts ensure the solutions we build align with your business vision, can yield long-term results, and drive the growth of your business.
In a nutshell, at Successive Digital, we don’t just build eCommerce stores; we optimize them for long-term success backed by the robust capabilities of the Shopify platform.
In a recent project we worked on, we built a custom middleware solution as well as a Shopify 2.0 store to improve team collaboration as well as automate order processing and fulfillment, which has helped our client to witness a 3x revenue increase and 20x improvement in overall operational efficiency.
Want to get a glimpse of our Shopify solutions?
Conclusion
We are living in an era where your customers are not satisfied with just the bare minimum. They expect to be valued and get a personalized shopping experience that is unique only to them. Now, your retail store can never fulfill these demands, and hence, shifting towards online store development is required. However, building such a complex store requires you to choose the right eCommerce platform, such as Shopify. Apart from that, you must create a shopify workflow that includes the steps of the shopify development process:
- Product Discovery and Strategy
- Planning the Development Process
- Setting Up the Shopify Store
- Design and Development of the Store
- Mobile Responsiveness
- Adding Products and Information Pages
- Set up Checkout and Shipping
- Test and QA of the Store
- Launch the Store
By following these steps, you can streamline your store development process. Additionally, make sure to consider the post-launch best practices that will help in the continuous improvement and optimization of your store.
Moreover, it is also important to remember that a successful Shopify store development process demands expert assistance from development professionals who can not only handle the end-to-end development and deployment of the store but also facilitate a smooth launch followed by post-launch support for optimized performance.
So, don’t get puzzled by the complexities of custom Shopify store development. Hire Successive Digital as your Shopify development partner. Get in touch with us to book your personalized consultation with our professionals.

