

Video transcoding and transrating are critical processes for optimizing video content across various devices and platforms. With AWS, we can develop a seamless, serverless solution for automating these processes using S3, Lambda functions, and the FFMPEG library. FFMPEG is a powerful library for performing various video and audio operations. This blog will guide you through setting up an automated workflow that converts videos into multiple lower-resolution formats when uploaded to an S3 bucket and then storing the output in an S3 destination bucket. We will explore manual and CloudFormation-based methods for creating an FFMPEG layer and demonstrate how to integrate it with a Lambda function for efficient video processing.
Let’s begin!
Using FFMPEG in a Lambda Function
To leverage FFMPEG within a Lambda function, you must create an FFMPEG layer manually or via CloudFormation.
Creating an FFMPEG Layer Manually
- In your working directory, download and unpack the latest static release of FFmpeg for Linux (amd64) from this link. For your convenience, we have shared the the commands that you can use:
| Wget https://johnvansickle.com/ffmpeg/releases/ffmpeg-release-amd64-static.tar.xz wget https://johnvansickle.com/ffmpeg/releases/ffmpeg-release-amd64-static.tar.xz.md5 md5sum -c ffmpeg-release-amd64-static.tar.xz.md5 tar xvf ffmpeg-release-amd64-static.tar.xz |
- The FFmpeg binary is located in the folder “ffmpeg-4.3.2-amd64-static” (as version 4.3.2 is the latest release available at the time when we were performing the job). Now create a ZIP file for the Lambda layer as follows:
| mkdir -p ffmpeg/bin cp ffmpeg-4.3.2-amd64-static/ffmpeg ffmpeg/bin/ cd ffmpeg zip -r ../ffmpeg.zip . |
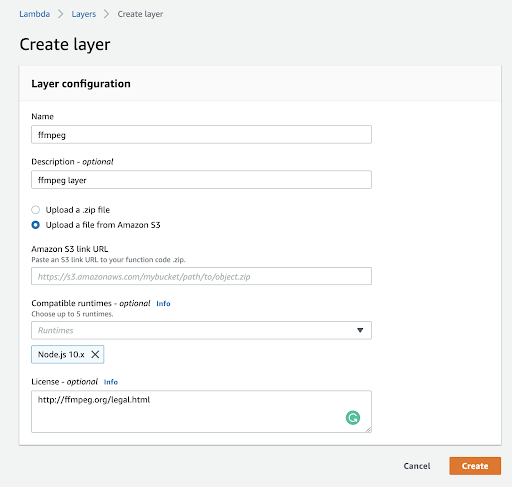
- Upload ffmpeg.zip package to S3 and create an FFMPEG layer in the Lambda console by selecting the ffmpeg.zip package from S3 as shown in the below image. For this demo, we only need the “Node.js 10.x” runtime, but you can add additional runtimes if required from the drop-down list to the Layer configuration.
Creating an FFMPEG Layer Using CloudFormation
- Inside your base repository, create a Makefile file and include the following code:
| STACK_NAME ?= ffmpeg-lambda-layer clean: rm -rf build build/layer/bin/ffmpeg: mkdir -p build/layer/bin rm -rf build/ffmpeg* cd build && curl https://johnvansickle.com/ffmpeg/releases/ffmpeg-release-amd64-static.tar.xz | tar x mv build/ffmpeg*/ffmpeg build/ffmpeg*/ffprobe build/layer/bin build/output.yaml: template.yaml build/layer/bin/ffmpeg aws cloudformation package –template $< –s3-bucket $(DEPLOYMENT_BUCKET) –output-template-file $@ deploy-layer: build/output.yaml aws cloudformation deploy –template $< –stack-name $(STACK_NAME) aws cloudformation describe-stacks –stack-name $(STACK_NAME) –query Stacks[].Outputs –output table |
- In the same repository, create a template.yaml file with the following code:
| AWSTemplateFormatVersion: 2010-09-09 Transform: AWS::Serverless-2016-10-31 Description: > ffmpeg layer Resources: LambdaLayer: Type: AWS::Serverless::LayerVersion Properties: LayerName: ffmpeg Description: FFMPEG for AWS Lambda ContentUri: build/layer CompatibleRuntimes: – nodejs10.x – python3.6 – ruby2.5 – java8 – go1.x LicenseInfo: GPL-2.0-or-later RetentionPolicy: Retain Outputs: LayerVersion: Description: Layer ARN Reference Value: !Ref LambdaLayer Metadata: AWS::ServerlessRepo::Application: Name: ffmpeg-lambda-layer Description: > Static build of FFmpeg/FFprobe, packaged as a Lambda layer. Bundles FFmpeg 4.1.3 Author: successive SpdxLicenseId: GPL-2.0-or-later LicenseUrl: LICENSE.txt ReadmeUrl: README-SAR.md Labels: [‘layer’, ‘lambda’, ‘ffmpeg’, ‘ffprobe’] HomePageUrl: https://github.com/aditya-nx?tab=repositories SemanticVersion: 1.0.0 SourceCodeUrl: https://github.com/aditya-nx?tab=repositories |
- Inside that repo, use command AWS_PROFILE=<YOUR AWS PROFILE> make deploy-layer DEPLOYMENT_BUCKET=<YOUR BUCKET NAME>
- This will create a ffmpeg layer.
Creating a Lambda Function with FFMPEG Layer
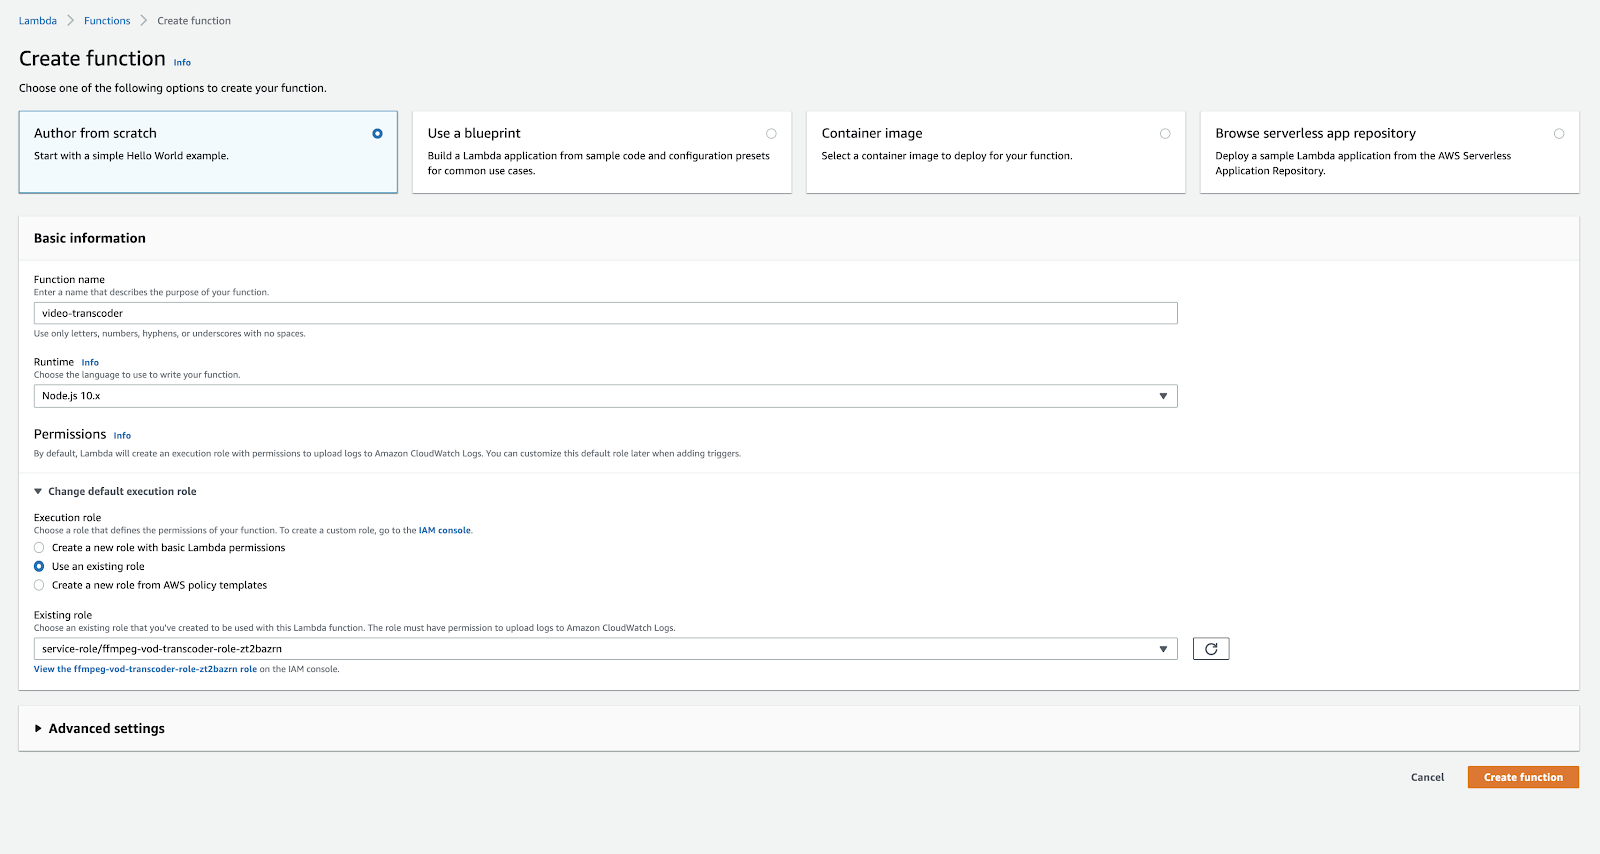
- Create a Lambda function in the AWS Console as as shown in below image:
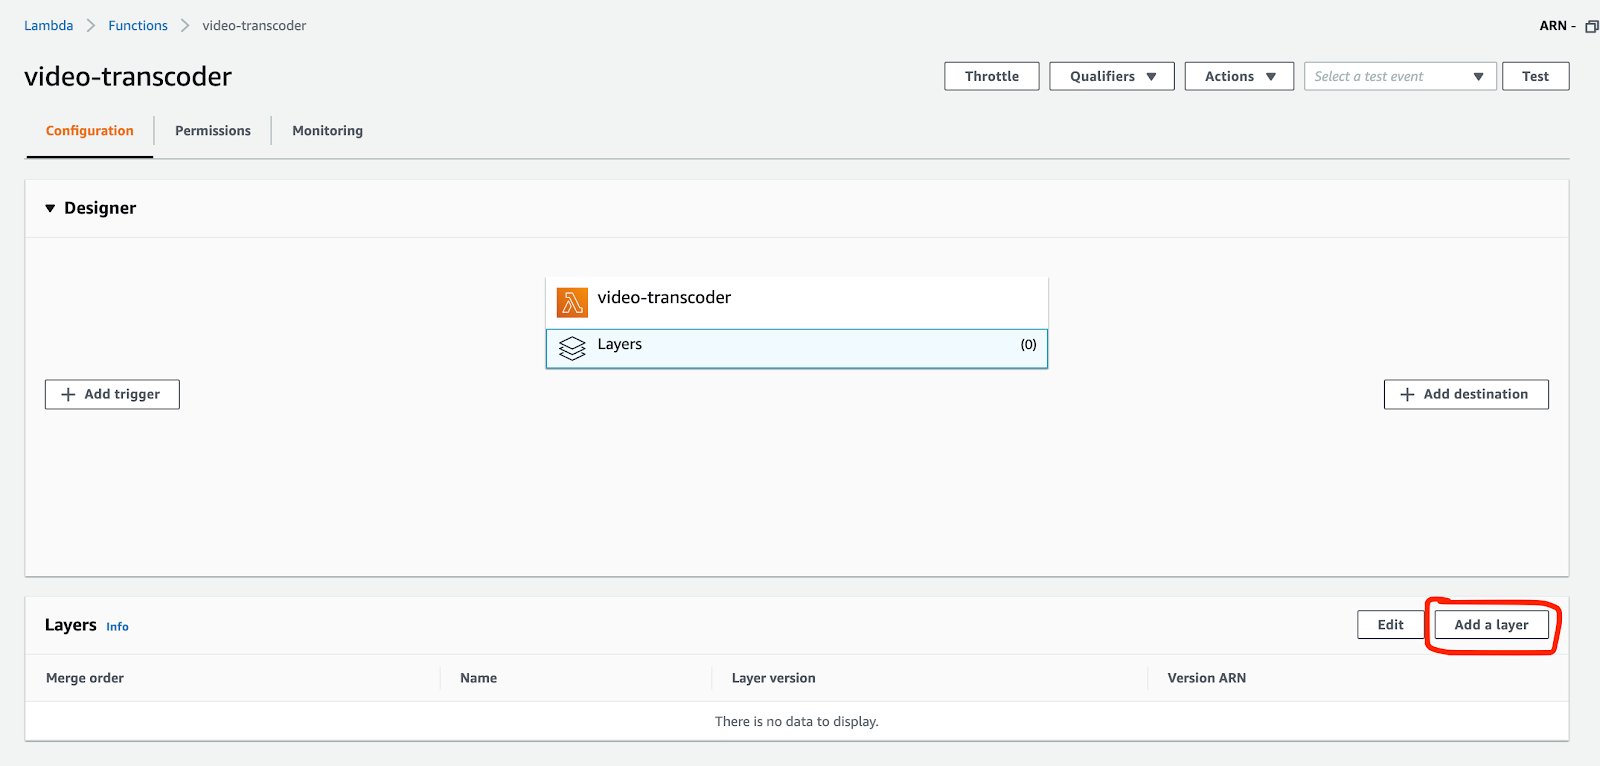
- Add the custom FFMPEG layer you created, as displayed in the image below:
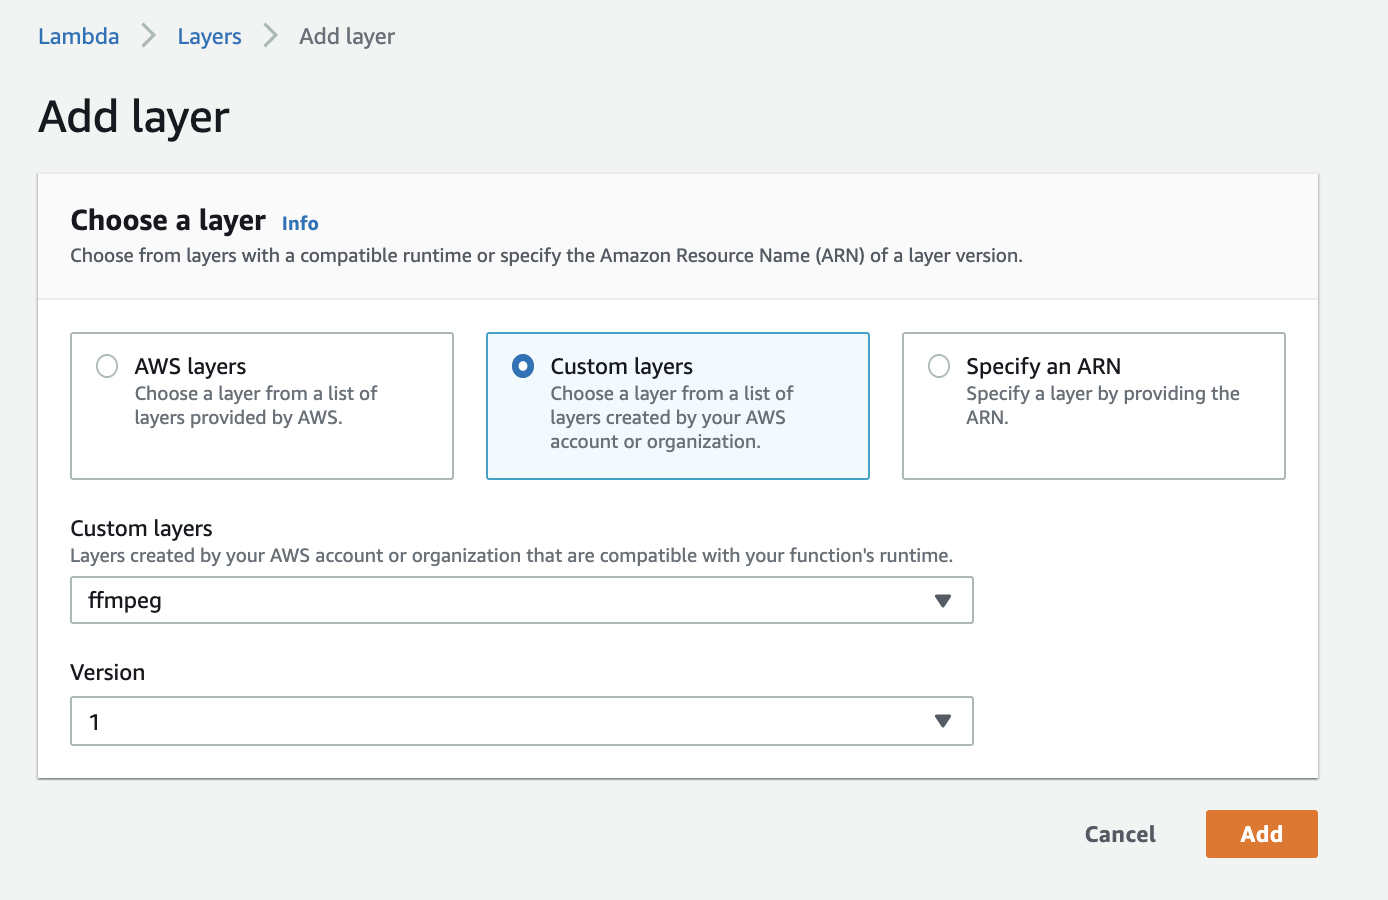
- Select Custom layers and choose ffmpeg as the custom layer which was created earlier:
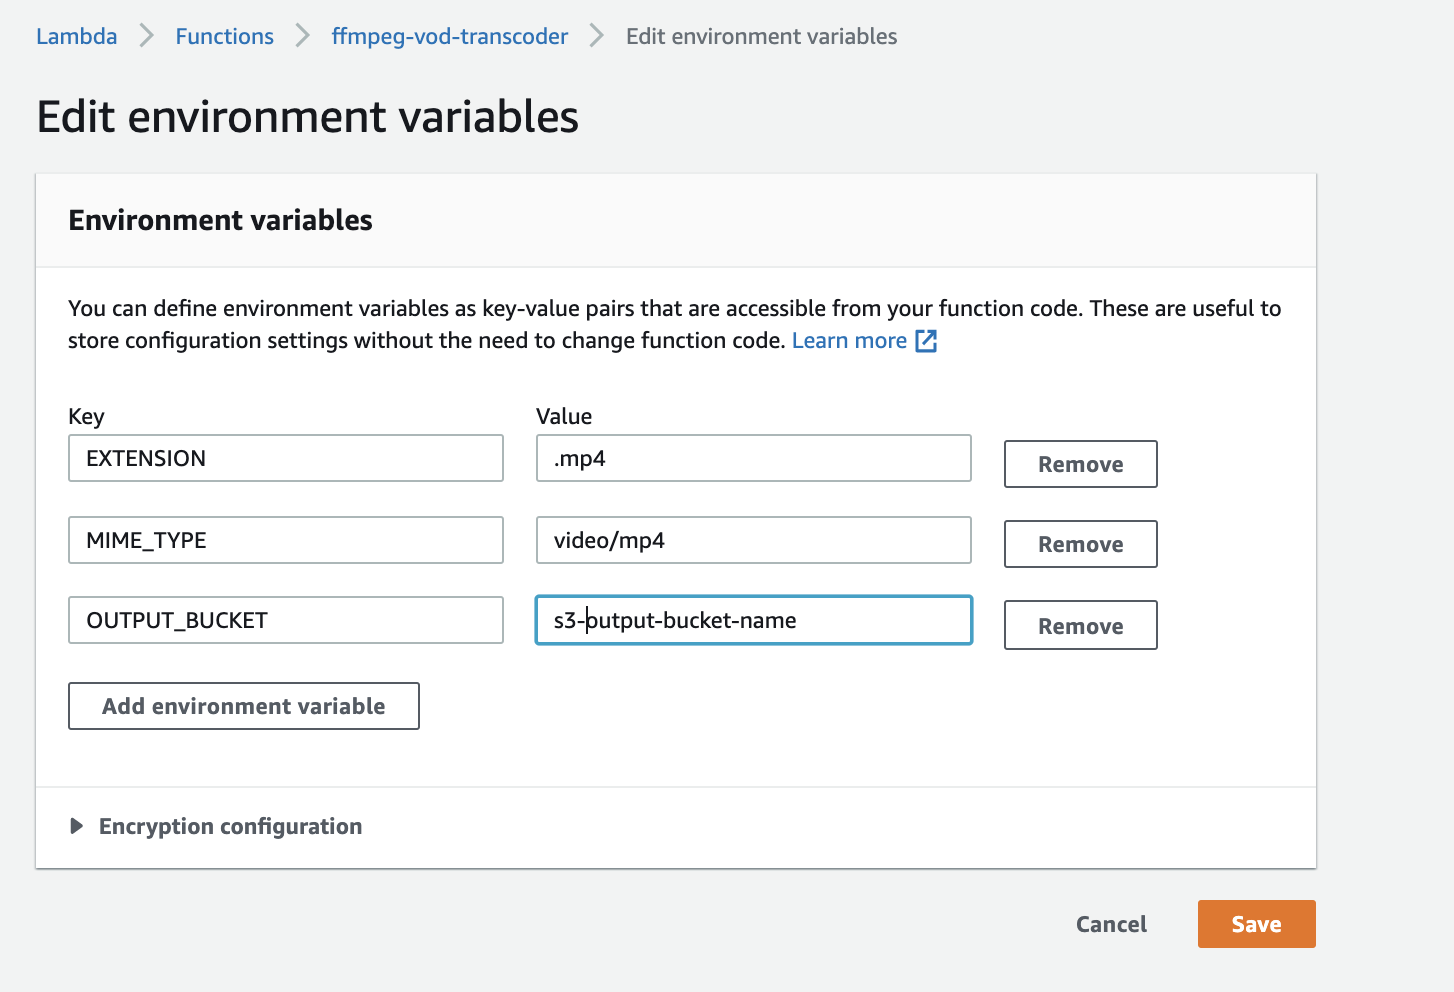
- Add the required environment variables to the Lambda function:
- Create an index.js file in the lambda function and write the following code:
| const s3Util = require(‘./s3-util’), childProcessPromise = require(‘./child-process-promise’), path = require(‘path’), os = require(‘os’), fs = require(‘fs’), EXTENSION = process.env.EXTENSION, THUMB_WIDTH = process.env.THUMB_WIDTH, OUTPUT_BUCKET = process.env.OUTPUT_BUCKET, MIME_TYPE = process.env.MIME_TYPE; exports.handler = async function (eventObject, context) { const eventRecord = eventObject.Records && eventObject.Records[0], inputBucket = eventRecord.s3.bucket.name, key = eventRecord.s3.object.key, id = context.awsRequestId, resultKey = key.replace(/\.[^.]+$/, EXTENSION), workdir = os.tmpdir(), inputFile = path.join(workdir, id + path.extname(key)); let uriComponents = key.split(“/”); let fileName = uriComponents[uriComponents.length – 1]; fileName = fileName.split(‘.’).slice(0, -1).join(‘.’); fileName = fileName.split(‘-‘).slice(0, -1).join(‘-‘); await s3Util.downloadFileFromS3(inputBucket, key, inputFile); //Get the current resolution of the video const data = await childProcessPromise.spawn( ‘/opt/bin/ffprobe’, [‘-v’, ‘error’, ‘-select_streams’, ‘v:0’, ‘-show_entries’, ‘stream=width,height’, ‘-of’, ‘json’, inputFile], {env: process.env, cwd: workdir} ); let result = JSON.parse(data); const originalHeight = result.streams[0].height; const resolutions = getRemainingResolution(originalHeight); await Promise.all(resolutions.map(res => { let outputFile = path.join(workdir, id + res + EXTENSION); //Commands for different resolutions let resolutionCommands = { 360: [‘-loglevel’, ‘error’, ‘-y’, ‘-i’, inputFile, ‘-preset’, ‘slow’, ‘-codec:a’, ‘aac’, ‘-b:a’, ‘128k’, ‘-codec:v’, ‘libx264’, ‘-pix_fmt’, ‘yuv420p’, ‘-b:v’, ‘750k’, ‘-minrate’, ‘400k’, ‘-maxrate’, ‘1000k’, ‘-bufsize’, ‘1500k’, ‘-vf’, ‘scale=-2:360’, outputFile], 480: [‘-loglevel’, ‘error’, ‘-y’, ‘-i’, inputFile, ‘-preset’, ‘slow’, ‘-codec:a’, ‘aac’, ‘-b:a’, ‘128k’, ‘-codec:v’, ‘libx264’, ‘-pix_fmt’, ‘yuv420p’, ‘-b:v’, ‘1000k’, ‘-minrate’, ‘500k’, ‘-maxrate’, ‘2000k’, ‘-bufsize’, ‘2000k’, ‘-vf’, ‘scale=854:480’, outputFile], 720: [‘-loglevel’, ‘error’, ‘-y’, ‘-i’, inputFile, ‘-preset’, ‘slow’, ‘-codec:a’, ‘aac’, ‘-b:a’, ‘128k’, ‘-codec:v’, ‘libx264’, ‘-pix_fmt’, ‘yuv420p’, ‘-b:v’, ‘2500k’, ‘-minrate’, ‘1500k’, ‘-maxrate’, ‘4000k’, ‘-bufsize’, ‘5000k’, ‘-vf’, ‘scale=-2:720’, outputFile], 1080: [‘-loglevel’, ‘error’, ‘-y’, ‘-i’, inputFile, ‘-preset’, ‘slow’, ‘-codec:a’, ‘aac’, ‘-b:a’, ‘128k’, ‘-codec:v’, ‘libx264’, ‘-pix_fmt’, ‘yuv420p’, ‘-b:v’, ‘4500k’, ‘-minrate’, ‘4500k’, ‘-maxrate’, ‘9000k’, ‘-bufsize’, ‘9000k’, ‘-vf’, ‘scale=-2:1080’, outputFile], }; return childProcessPromise.spawn( ‘/opt/bin/ffmpeg’, resolutionCommands[res], {env: process.env, cwd: workdir} ).then(() => s3Util.uploadFileToS3(OUTPUT_BUCKET, `${fileName}-${res}${EXTENSION}`, outputFile, MIME_TYPE)); })); return true; }; //Get all the lower resolutions of video from the current resolution of the video const getRemainingResolution = (currentResolution) => { const resolutions = [1080, 720, 480, 360, 240]; const index = resolutions.findIndex((value) => value <= currentResolution); return resolutions.slice(index + 1, resolutions.length); }; |
- Create a s3-utill.js file in the lambda function and write the following code:
| const aws = require(‘aws-sdk’), fs = require(‘fs’), s3 = new aws.S3(), downloadFileFromS3 = function (bucket, fileKey, filePath) { ‘use strict’; return new Promise(function (resolve, reject) { const file = fs.createWriteStream(filePath), stream = s3.getObject({ Bucket: bucket, Key: fileKey }).createReadStream(); stream.on(‘error’, reject); file.on(‘error’, reject); file.on(‘finish’, function () { resolve(filePath); }); stream.pipe(file); }); }, uploadFileToS3 = function (bucket, fileKey, filePath, contentType) { ‘use strict’; return s3.upload({ Bucket: bucket, Key: fileKey, Body: fs.createReadStream(filePath), ACL: ‘private’, ContentType: contentType }).promise(); }; module.exports = { downloadFileFromS3: downloadFileFromS3, uploadFileToS3: uploadFileToS3 }; |
- Create a child-process-promise.js file in the lambda function and write the following code:
| ‘use strict’; const childProcess = require(‘child_process’), spawnPromise = function (command, argsarray, envOptions) { return new Promise((resolve, reject) => { const childProc = childProcess.spawn(command, argsarray, envOptions || {env: process.env, cwd: process.cwd()}), resultBuffers = []; childProc.stdout.on(‘data’, buffer => { console.log(buffer.toString()); resultBuffers.push(buffer); }); childProc.stderr.on(‘data’, buffer => console.error(buffer.toString())); childProc.on(‘exit’, (code, signal) => { if (code || signal) { reject(`${command} failed with ${code || signal}`); } else { resolve(Buffer.concat(resultBuffers).toString().trim()); } }); }); }; module.exports = { spawn: spawnPromise }; |
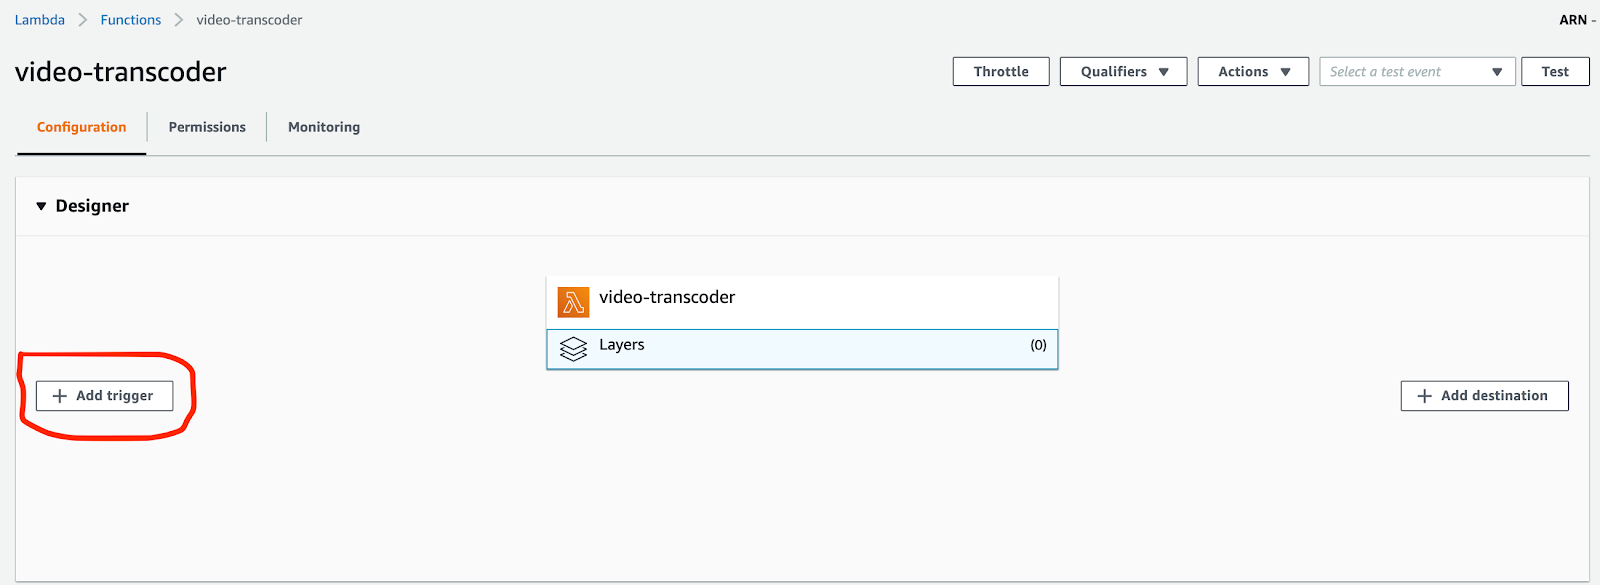
Adding an S3 Event Trigger to Lambda
Add S3 event trigger to the lambda function using the Add Trigger button on the Lambda Function Page:
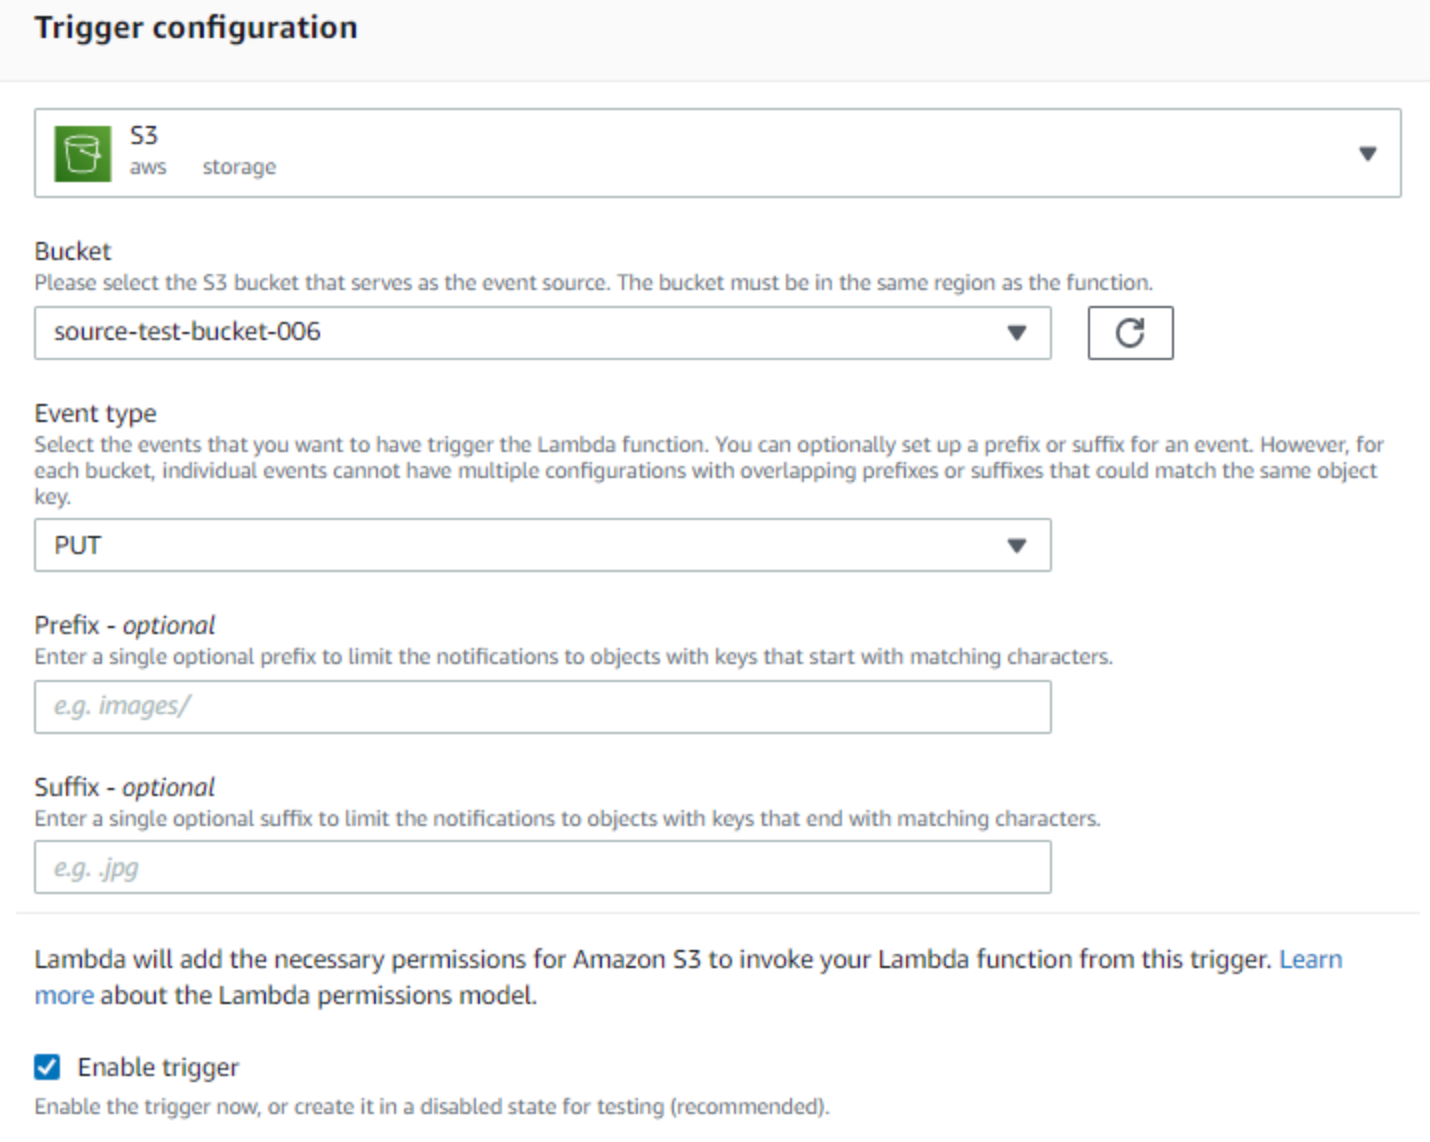
We are using PUT since we want this event to trigger our Lambda when new files are uploaded to our source bucket. You can add Prefix & Suffix if you need a particular type of file. Check on Enable Trigger.
You are done now. When you upload any video to the source S3 bucket, all the possible lower versions of video will be created and uploaded to the output S3 bucket.
Conclusion
By using AWS S3, Lambda, and FFMPEG, you can automate the process of transcoding and transrating videos to multiple resolutions with ease. This scalable and serverless approach minimizes infrastructure management while ensuring efficient video processing. Whether you choose to implement the FFMPEG layer manually or through CloudFormation, the integration with Lambda allows for a flexible and powerful workflow. This solution is ideal for use cases requiring video optimization across different platforms or devices, offering both performance and cost benefits.