


With the rapid transformation of the digital world, several technologies are continuously redefining how mobile applications make the user experience more interactive. In this scenario, Augmented Reality (AR) has emerged as a game-changer by seamlessly merging the real and virtual worlds. However, as the demand for AR apps grows, businesses must opt for development practices and tools to create a future-ready, versatile application. One such robust cross-platform framework is Flutter. By combining Flutter and AR, businesses will have endless opportunities to integrate tools and features that extend the functionality of their mobile app and help them stand out. But for seamless integration of Flutter in your AR app, it’s best to outsource a professional Flutter app development company, as they will have adequate experience to leverage the right Flutter tools and integrate them into the app in such a way that it not only appeals to your customers but also aligns with your app goals.
The blog below will explore why you should choose Flutter for AR app development and quick steps for development.
An Overview of Flutter
Flutter is an open-source UI software development framework created by Google, designed to build natively compiled cross-platform apps that can run over any compatible platform and operating system from a single codebase. Flutter-based apps can run smoothly everywhere with a consistent user interface, whether over mobile, web, or desktop. It is renowned for its fast and expressive way of creating visually appealing, high-performance applications that keep users engaged even if they switch platforms. It comes with a rich set of customizable, reusable widgets and built-in features, allowing Flutter developers to enhance the app development process and reduce the need for platform-specific code, ultimately saving time and resources.
Are you looking to build a Flutter-based app? Then check out our Flutter app development guide to get started.
Understanding Augmented Reality
Augmented Reality, widely called AR, is an innovative technology that enhances how users interact with the real world. It overlays digitally created content like text, images, and even complex 3D models and animations onto our existing environment. This technology achieves its function by utilizing a device (such as a smartphone or smart glasses) equipped with sensors and advanced computer vision algorithms that capture the real-world view, interpret it, and track the user’s interaction with the environment.
According to a study conducted by ARtillery Intelligence, there are 1.4 billion AR user devices in active use, which is expected to increase to 17.3 billion by 2024. This explains its growing significance and usage for the coming years.
Moreover, being a powerful technology, its application can be seen across multiple industries, including healthcare, eCommerce, finance, manufacturing, etc. Combining Augmented Reality with Flutter allows developers to create a feature-rich interactive app to help your business stay competitive.
Benefits of Choosing Flutter for AR App Development
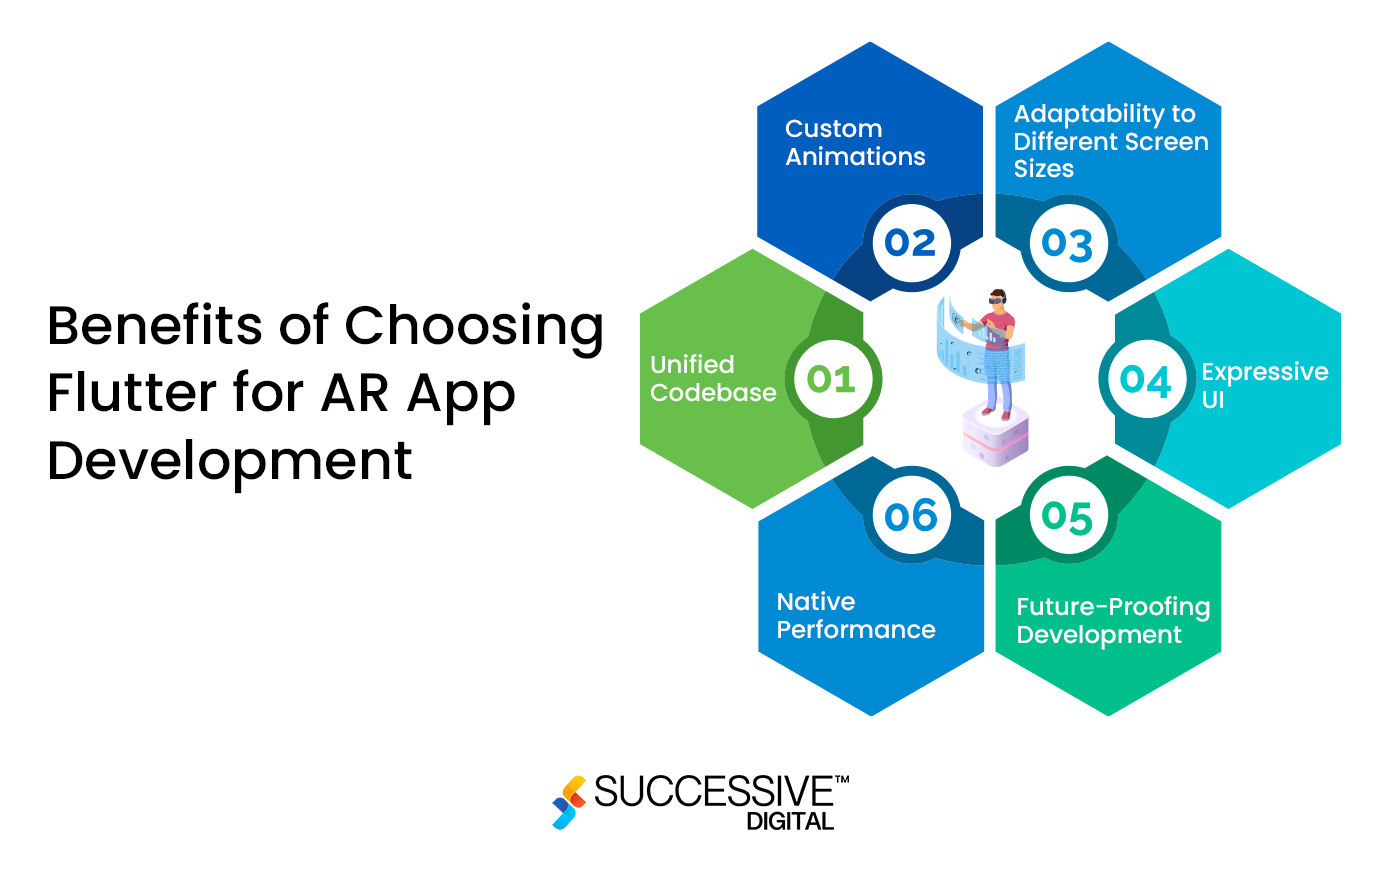
Flutter has emerged as a top cross-platform framework for building mobile immersive AR experiences. It offers various benefits, making it an optimal option for Flutter-augmented reality app development. Let’s explore them below:
Unified Codebase
Flutter’s single codebase approach means the developers you hire for Flutter app development services can develop an AR app once and deploy it to both major mobile platforms. This saves significant development time and resources.
Custom Animations
AR applications often rely on intricate animations to enhance user engagement and deliver captivating experiences. Flutter excels in this aspect, offering a wide range of tools and a dedicated widget library for creating custom animations. Whether bringing AR objects to life or designing fluid transitions, Flutter empowers you to build creative apps that appeal to your customers.
Adaptability to Different Screen Sizes
With plenty of smart devices available in the market today, making your AR adaptive over every device becomes essential. Flutter’s responsive design capabilities enable developers to create AR applications that look and perform consistently across various devices, from smartphones to tablets. This adaptability ensures a broader reach for the AR app, maximizing its impact on the target audience.
Future-Proofing Development
Building an AR app in Flutter is a strategic decision that goes beyond present outcomes. Google’s commitment to Flutter’s ongoing development and integration with emerging technologies positions it as a future-proof choice for AR app development. As AR continues to evolve, Flutter’s adaptability and support for cutting-edge features ensure that developers can stay ahead of the curve and incorporate the latest advancements into their applications.
Native Performance
Flutter utilizes native features and APIs of both major operating systems (iOS and Android). This is particularly advantageous for developing an AR app in Flutter, as it allows developers to tap into device-specific capabilities, such as camera functionalities and sensors. By leveraging these native features, Flutter-powered AR apps can deliver users a more immersive and responsive experience.
Expressive UI
Flutter’s widget-based architecture empowers developers to craft rich and expressive user interfaces for AR applications. The framework offers various customizable widgets, ensuring that AR app interfaces are visually appealing, intuitive, and tailored to the user’s specific needs. The seamless integration of Flutter-augmented reality elements into the overall design enhances the user experience and contributes to the application’s success.
Steps to Build an AR App in Flutter

Building an AR app in Flutter is a complex process and requires foolproof planning and a structured step-by-step strategy to make app development, deployment, and launch successful.
Step 1: Set Up Your Development Environment
Before building AR apps in Flutter, the developers will need to set up a development environment. Here is what they need to do:
- Install Flutter: Follow the official Flutter installation guide to install Flutter on your machine.
- Install ARCore: If you’re targeting Android devices, then they will install ARCore, which is Google’s AR platform for Android, and will follow the ARCore installation guide to set it up properly.
- Install ARKit: However, if you target iOS devices, they will install ARKit, which is Apple’s AR platform for iOS.
Step 2: Choosing an AR Framework or Plugin
Using an existing AR framework or plugin is ideal to simplify the augmented reality-Flutter development process. Choose the appropriate plugin based on your target platform, and the developers will add it as a dependency in your Flutter project’s pubspec.yaml file.
The two popular options in the AR plugin library are:
- ARKit Plugin: For iOS development, you can use the arkit_flutter_plugin package. It provides a Flutter interface to ARKit functionalities.
- ARCore Plugin: For Android development, you can use the arcore_flutter_plugin package. It offers a Flutter interface to ARCore capabilities.
Step 3: Designing AR App
Determine the purpose and functionality of your AR app. Consider how you want to integrate AR into your app’s user interface and user experience. Sketch out the user flows and design elements related to AR, such as marker detection, object placement, and interaction with the AR scene. Define the 3D assets or models you’ll use in your app. Based on these requirements, the mobile app design company will create a UI/UX design for your AR app.
Step 4: Implementing AR Functionality and Testing
Once the app design is handy, the next step is to implement AR functionality based on the design and then test it to ensure every app function meets your expectations and maintains optimal performance under all circumstances. Here are the general steps the AR developers will take to implement functionality.
- Set up AR sessions: Initialize an AR session using the ARKit or ARCore plugin.
- Configure AR settings: Adjust session configurations, such as tracking types, light estimation, and plane detection settings, based on your app’s requirements.
- Create AR views: Create an AR view widget in your app’s UI to render the AR scene.
- Handle AR events: Implement event listeners to handle AR-related events, such as plane detection, object placement, and user interaction.
- Load and render 3D objects: Load your 3D models or assets into the AR scene and position them relative to detected planes or user interactions.
- Implement interactivity: Implement interactive tools and functions in the app to allow users to interact with the AR scene, such as tapping on objects, dragging them, or triggering actions.
- Manage anchors and tracking: Keep track of anchors (fixed positions in the AR scene) and update their positions as the device moves or as new planes are detected.
- Enhance visuals: Apply materials, textures, animations, or effects to your 3D objects to enhance the visual experience.
- Test thoroughly: Direct the development team to test your app on different devices and scenarios to ensure stability and usability.
Step 5: Building an MVP
After incorporating the app design and functionalities, the developers will build an MVP containing basic features for your AR app to test it with real end users and attain feedback. It is essential to learn whether your app will be helpful for your target audience or whether you should make iterations before adding any complex features.
Moreover, check out our blog on Ultimate Guide to MVP development to understand the core benefits and how to create one for your Flutter-Augmented Reality app.
Step 6: Deploying and Launching
Once the functionalities are implemented and the app’s MVP is tested with real users, the next step is to iterate improvements based on feedback and launch it across application stores (Play Store and App Store).
Step 7: Monitoring and Maintenance
Now that the application is launched, you must monitor its performance and consult your hired development company to install updates to ensure its streamlined functionality regularly. The company will also ensure that the app is bug-free and can run smoothly on every screen and device.
Also read- A Comprehensive Guide to Launch Web Apps with Flutter.
Technical Considerations of Flutter-Augmented Reality App Development
Before planning to build AR apps in Flutter, it’s important to understand various technical aspects as mentioned below:
-
Flutter and ARKit
Flutter apps can integrate with ARKit on iOS using the arkit_plugin package. This enables plane detection, placing anchors, hit testing, and rendering SceneKit 3D content. ARKit provides robust capabilities like global tracking, real-time occlusion, focus tracking, and image recognition. The developers can leverage ARKit with Flutter to create apps with sophisticated AR features. For example, you can use ARKit to build a Flutter app that allows users to place virtual furniture in their homes.
-
3D Models and Animations for AR
Flutter augmented reality applications require optimized, lightweight 3D models and animations capable of running at 120fps for 120hz devices. Use efficient polygon meshes, texture sizes, and materials. Explore hosting models on remote servers versus bundling into the app package. Animate models using built-in ARKit animations, vertex animations, or skeletal animations.
-
Detecting Planes, Anchors, and Gestures
ARKit detects horizontal and vertical planes in the environment where virtual objects can be placed realistically. Anchors persist in specific 3D coordinates, so the content stays fixed to real-world positions. The framework also enables recognizing taps, pans, pinches, and other gestures for natural user interaction.
-
Interactivity and Physics to Improve AR Experiences
Make your AR experiences interactive using touch input to move objects around and audio sources to spatialize sounds in 3D space. Apply real-world physics like gravity, collisions, and friction to make virtual objects feel real and reactive for the end users.
Cost of Flutter-based AR App Development
On average, building an AR app in Flutter can cost about $150,000 to $500,000. The basic AR app will be cheaper as compared to complex apps that cost higher. Additionally, the cost will depend on factors such as the app type, complexity, and number of features added. But remember that these are mere rough figures; to get an actual estimation, you must consult a professional company.
Let’s look at the table explaining the monthly and annual development costs and the timeframe we offer at Successive:
| Hourly Rate | Timeframe | Development Cost |
| $25-100/hr | 800 Hours | $20,000 |
Wondering how much Flutter-Augmented Reality app development costs? Then check out our blog on mobile app development cost to learn the impacting factors and cost breakdown.
Conclusion
AR technology will drastically transform how we interact with information and the physical environment. By combining it with Flutter, you can create next-generation AR experiences for your customers through your app. Flutter provides cross-platform and powerful 3D capabilities to build interactive UI design for your app. With the right mix of technical execution, creative thinking, and Flutter’s strengths, developers of the AR app development company can craft apps that push boundaries and set new standards. Leveraging augmented reality with Flutter will propel new possibilities in the world of mobile app development and allow businesses to transform their customers’ experience.