


Migration is a complex process that can be expensive and time-consuming and cause issues that may take time to fix. A smooth and secure transfer from WooCommerce to Adobe Commerce can save you time and money. This ultimate guide breaks down the migration process from WooCommerce to Adobe Commerce (Magento).
Adobe Commerce Platform has emerged as one of the most preferred eCommerce platforms in the world. With over a million users in more than 100 countries, it is the leading eCommerce platform in the world. While WooCommerce has been a market leader for a long time and continues to dominate, it is time to take a look at the merits of Adobe Commerce and the challenges of migrating from WooCommerce to Adobe Commerce.
Now, let’s get started to know the process of migration from WooCommerce to Adobe Commerce in detail-
Process of WooCommerce to Adobe Commerce (Magento) Migration
Step 1: Backup Your Data
Whether you’re a seasoned store manager or just starting out, taking regular backups of your website should be a top priority. The backbone of any future database is your e-commerce entities, so you’ll want to prevent any possible information loss. One can backup their WooCommerce store data using three different ways as following:-
- Manually Backup WooCommerce
- Use Web Host to Backup WooCommerce Store Data
- WordPress Plugin to Backup WooCommerce Store
-
Manually Backup WooCommerce
- Firstly, download your WordPress website file to your computer. To do this,
- Use FTP tool like FileZilla
- File Manager in cPanel of your web host account
- After that, you need to back up your database. Access phpMyAdmin via your host database panel.
- Now, choose the database from the wp-config.php file.
- At last, select all the tables and tap on the Export button to back up the data.
-
Web Host to Backup WooCommerce Store Data
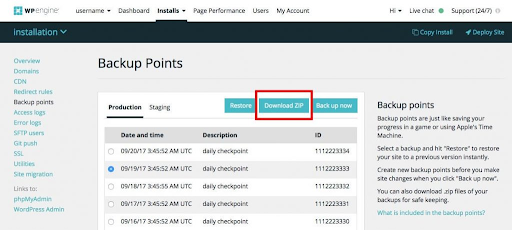
Most WordPress hosting companies offer backups as a free or extra-charged function. They do, however, often offer daily backups. Finding a server that provides real-time backup service takes a lot of work. However, if you wish to backup your database using your hosting company, follow these instructions:
-
- First of all, Contact your web hosting provider and download the last backup.
-
- You may manually export and back up your database. As an alternative, use the MySQL manager to export the database to a local folder.
-
WordPress Plugin to Backup WooCommerce Store
The simplest approach to backup WordPress sites is by using an automatic backup plugin. Installing and using it is quick and easy. Numerous plugins, such BlogVault, UpdraftPlus, and BackupBuddy, simplify the backup procedure and make conducting and managing backups quite easy.
Step 2: Now Install Magento
When deciding to migrate the WooCommerce store to Magento (Adobe Commerce), it’s required to have Magento installed. Follow the below-listed steps to install the Magento store-
- First, download the Magento software package;
- Next, Setup FTP;
- After that, transfer the Magento archive to your hosted system with FileZilla;
- At last, run Setup Wizard.
Step 3: Data Migration from WooCommerce to Adobe Commerce (Magento)
There are three different ways to migrate the WooCommerce store to Adobe Commerce.
- Yourself (Manually)
- By a professional company
- An automated shipping cart migration service
We’ll go through each of them step by step. After comparing the three approaches, you may pick the most incredible fit.
Yourself (Manual Approach to Perform Migration from WooCommerce to Adobe Commerce (Magento))
This method can be successfully achieved in a combination of two steps. First of all, we have to export the data from WooCommerce, and later on, we have to import the exported (WooCommerce) data to Abode Commerce (Magento).
(A). Export WooCommerce Data
- Firstly, open the WordPress admin panel, and click on Export Orders. Additionally, choose the output file as CSV and tap on the Export button.
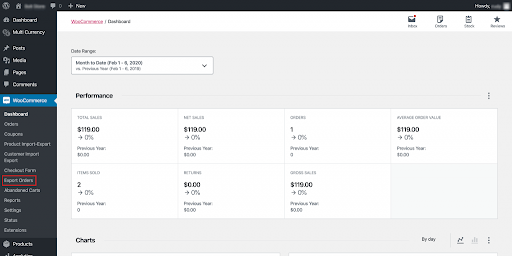
The step mentioned above will download a CSV file with all the orders. (The downloaded CSV file will be used in the import process to Magento)
- Now, export the product data from WooCommerce. Here, from the WooCommerce admin panel, select Product Import-Export. You will find several export options after the step.
- Now, select the product attributes you want to export, and to export the selected product attribute, click on the Export Product button.
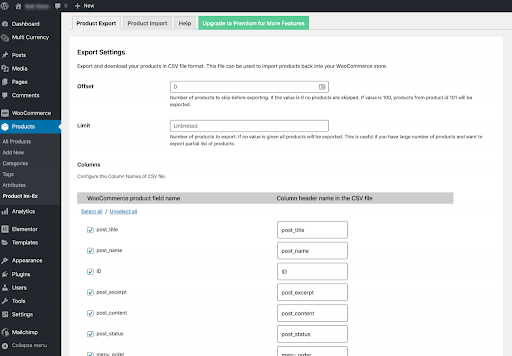
(Performing the above step will download a CSV file with all the product information)
- At last, we will export the customer data from our WooCommerce store. To do this- click on the Customer Import-Export from the admin panel of WooCommerce.

- Here, you can select the particular checkboxes that you want to export. Also, one can export all customer data from the WooCommerce admin panel. To do this, click on the Export Users option to export the customers’ data successfully.
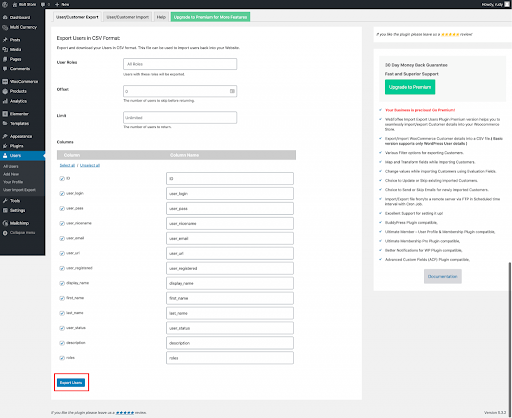
(This way, you can download a CSV file containing all the customers’ data).
Now, we have exported all the data from our WooCommerce store. So, as mentioned above, we have to perform the second step (import the exported data to Magento) to complete the manual migration process from WooCommerce to Adobe Commerce (Magento).
(B). Import to Magento (Adobe Commerce)
Now, you must import the exported WooCommerce data into Magento. The Magento store can import data for any goods. Furthermore, you can import customers’ information, client address information, product photos, and data on advanced pricing. Although this may appear difficult to understand initially, we break it down into manageable pieces.
Also Read: The Ultimate Guide to Magento to Shopify Migration
Step 1: Must Verify Database Compatibility of Both
It would be best to verify platform compatibility between the two platforms before integrating the downloaded CSV files into Magento. To do this, download the Magento CSV example files and contrast them with the CSV file downloaded for WooCommerce.
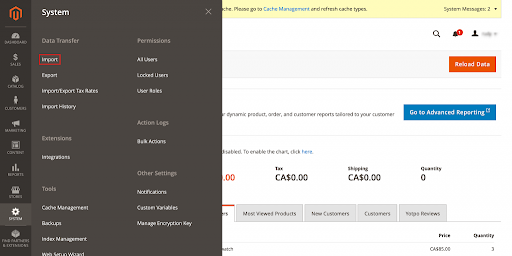
- First of all, navigate to your Magento admin.
- After that, go to System>>Data Transfer>>Import.
- Now, set the Entity type under the Import settings.
- Here, locate the export file from the download location for your web browser & open the file.
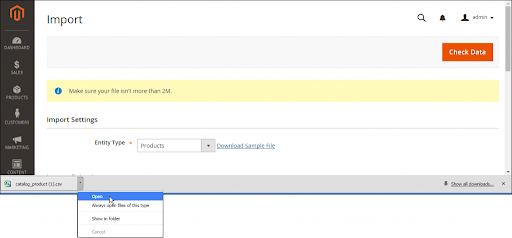
- Use the sample file’s structure as a guide to ensure that the column headers in your CSV import file are proper.
- Make sure your import file is no more than 2M in size.
- Ensure the image files are uploaded to the correct location if the import data contains paths to product pictures. The Magento server’s default location is pub/media/import.
Make sure you have the whole URL of the directory containing the images if they are stored on an external server.
Step 2: Prepare Data Transfer
- Click “System” in the Admin menu located in the left sidebar. Click “Import” on the Import screen under the Data Transfer section.
- Before proceeding, you will select settings from the Import page. First, under Import Settings, choose the “Entity Type” you wish to move. Choose the entity type to which you are currently migrating:
- Advanced Pricing
- Products
- Customers and Addresses
- Customers Main File
- Customer Addresses
Step 3: Select the Import Behavior
- As we are done with the Import settings, thus let’s start the Import Behavior section.
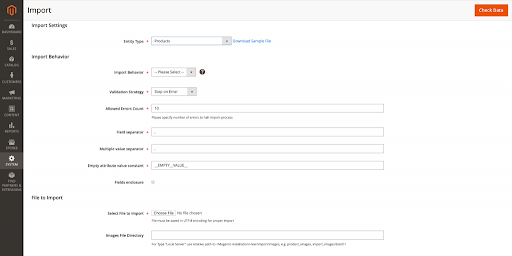
- Under the drop-down of the Import Behavior menu, select any one from the below-listed actions:-
-
- Add/Update
- Replace
- Delete
- After that, we have to set up a parameter for an error pop-up while the process runs. To do this, navigate to Validation Strategy and select from the below-listed option:-
-
- Stop on Error
- Skip error entries
Error limitations are manually defined so that the import operation will be terminated if exceeded. In the “Allowed Errors Count,” enter the value you want to serve as the error threshold. The maximum error count by default is 10.
Make sure to add a comma (,) in the “Field separator” and “Multiple value separator” boxes, as you’ll be moving data using a CSV file. As a comma is the default separator for a CSV file, this is the default option, but you should double-check this before continuing. Change the separating value if your import file uses a different character to ensure that the file imports correctly.
To include special characters in the data as escape sequences, tick the “Fields enclosure” box.
Step 4: Identify the Import (CSV) File
Now, select the CSV file to import. To do this, click on the Choose File option, select the file, and tap Open to import the selected CSV file.
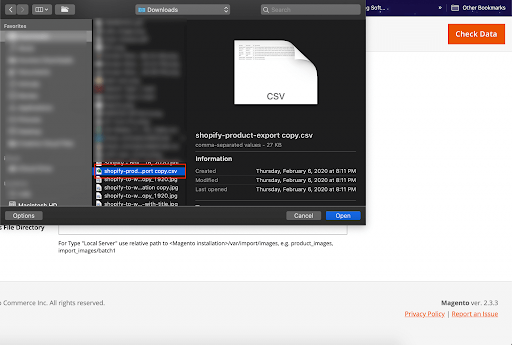
Enter the relative path to where images are saved on the Magento server in the “Images File Directory” field. For example, it may appear as var/import.
Step 5: Check the Import Data
After making all the necessary settings on the Import page, click “Check Data” to examine the data and determine whether it is suitable for the transfer. It can take some time to complete this.
A “File is valid! ” message will appear in the verification message after import data is reported as being accurate. Press the “Import” button to start the import procedure. This shows that the data is prepared for import. To start the transfer, click “Import.”
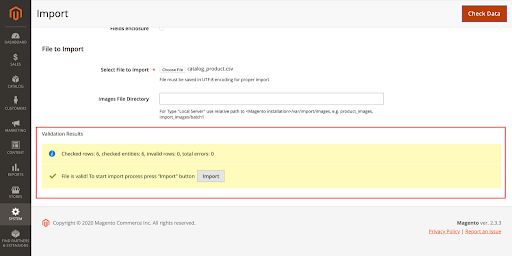
The errors will be reported under Validation Results if the import is invalid. In this case, fix each mistake before resuming the import procedure.
The data will be imported when verified, and an import option has been selected. Processing should take some time.
Repeat this procedure for every entity type you want to migrate when the import is finished.
As you can see, migration from WooCommerce to Magento takes a while and calls for technical expertise. Another drawback worth considering is the restriction on imported data. Certain data, including orders, product SKUs, etc., cannot be moved.
Let’s move on to the second migration method to see how it might help you with your troubles.
Must Read: Adobe Commerce (Magento) vs BigCommerce: Which One to Choose?
Migrate WooCommerce Store to Magento (Adobe Commerce) via A Professional Company
There are many reasons to migrate WooCommerce to Magento (Adobe Commerce). Magento is a more robust and scalable eCommerce platform than WooCommerce. It offers a broader range of features and options for businesses of all sizes. Magento is also a more secure platform, which is essential for businesses that sell online.
When you migrate WooCommerce to Magento, you’ll need to hire a dedicated adobe commerce development company to help with the process. This is because Magento is a complex platform, and migrating to it can be challenging. A trustworthy company will have the experience and expertise to ensure your migration is successful.
Hiring a dedicated company to migrate WooCommerce to Magento is a wise investment for any business that wants to take its eCommerce to the next level. Magento offers many features and benefits to help businesses grow and succeed online. With the help of a dedicated migration company, you can make the switch to Magento with confidence, knowing that your eCommerce will be in good hands.
An Automated Shipping Cart Migration Service:
Several tools can help you migrate your WooCommerce store to Adobe Commerce. These tools can automate much of the migration process, making it faster and easier to move your data from one platform to the other.
Some popular migration tools for WooCommerce to Adobe Commerce include Litextension, Cart2Cart, and Wizkunde. These tools typically offer a range of features and pricing options, so it’s important to research and choose the tool that best fits your needs.
When choosing a migration tool, consider the following factors:
Compatibility: The tool should be compatible with both Adobe Commerce and WooCommerce and should be able to handle the data and assets that you need to migrate.
Ease of use: The tool should be user-friendly and easy to understand, so you can quickly and easily perform the migration.
Support: The tool should provide adequate support, such as documentation, tutorials, or customer service, to help you through the migration process.
Price: The tool should offer a reasonable price in line with your budget.
Also Related: A Complete Guide on Adobe Commerce Pricing
Start Magento Migration from WooCommerce
Once you have chosen a tool, you can start the process to migrate from WooCommerce to Adobe Commerce. This typically involves exporting your data from WooCommerce in a format that can be imported into Adobe Commerce and then imported into your new Adobe Commerce store.
The exact steps for this process will vary depending on the migration tool you are using, but in general, you will need to follow these steps:
- Connect your WooCommerce store to the migration tool.
- Select the data you want to migrate (e.g., products, orders, customers, etc.).
- Configure the settings for the migration, such as the destination store and any mapping or conversion options.
- Start the migration process.
- Monitor the migration progress and troubleshoot any issues that may arise.
Once the migration process is complete, it’s important to test and validate the migrated data to ensure everything has been migrated correctly. This may involve manually comparing the data in your old WooCommerce store with the data in your new Adobe Commerce store or using a tool to verify the data integrity automatically.
Once you have tested and validated the migrated data, you can go live with your new Adobe Commerce store. This typically involves pointing your domain name to the new store, updating links or references to the old store, and making final adjustments to the store’s settings or design.
Conclusion
Migration from WooCommerce to Adobe Commerce can be complex, but it can also provide significant benefits for your online store. By following the steps outlined in this guide, you can successfully migrate WooCommerce to Adobe Commerce and take advantage of the powerful features and functionality offered by Adobe Commerce(Magento).